Revolution in API client technology.

bruno client logo
Say goodbye to bloatware and hello to simplicity, efficiency and freedom.
Tired of Postman’s bloatware? Join the open-source revolution! ✊
Mission:
- Ditch proprietary clunky interface 👎 and say hello to a streamlined, open-source haven for API explorers. 👍
- Co-locate API collections with your code (no more ugly JSON blobs!). 💻
- Version control everything easily. No bloated workspaces! 🎮
- Clone a repo, fire up Bruno, and play with the API instantly. 🤾
- No more missing collections! ✨
Bruno:
Bruno is a revolution in API client technology who says goodbye to “Tim’s missing collection” blues: “Leave messy handoffs behind”. With Bruno, everyone’s always on the same page since file of api client is in the same directory where your project lives on. It embrace simplicity, efficiency, and developer’s freedom to developer.
I know above definition sucks, lets make it simple to understand. Lets say you work on a project XYZ in ABC company where you develop an API in api clients like: Postman, Insomnia, Hoppscotch, etc. Now, your project XYZ is finished and the developer who had worked in project has already left the company. Just think about the following questions?
- What if developers haven’t created a document?
- What if developers haven’t save the collection of API clients [postman, insomnia, hoppscotch]?
- What if developers can’t access the cloud of postman, insomnia, hoppscotch for some reason?
Now, imagine where developer create an API and save the API client’s collection to the same repository where the code lives. This is what Bruno provides for us. Its really a new way to test our API as well as manage our project using version control system. Isn’t it great?
As I have mentioned Bruno does have its own Domain Specific Language (DSL). Oops, yet new language to learn 😫. Just hold on its not that hard in fact it’s easier than JSON or YAML. Yes you read it right it’s really simple to learn. If you are curious to know about why the author chose to create a DSL or new language for bruno check out this discussion:
Why a domain specific language?
Bru Language:
Lets become familiar with the Bruno language “Bru” first. Its syntax is like groovy syntax. It consists of block and tags.
1. Block
A Bru file is made up of blocks. There are three kinds of blocks
- Dictionary block: A dictionary block contains of a set of key value pairs.
- Text blocks: A text block is a set of lines
- Array blocks: An array block is a list of strings
1. Dictionary block
get {
  url: https://api.textlocal.in/send
}
headers {
  content-type: application/json
  Authorization: Bearer 123
  ~transaction-id: {{transactionId}}
}
Any key in the dictionary block can be prefixed with ~ to indicate that it is disabled.
2. Text block
A text block is a set of lines
tests {
  expect(res.status).to.equal(200);
}
3. Array block
vars:secret [
  access_key,
  access_secret,
  ~transactionId
]
For more information: Language Design
2. Tag
Bru has something called tag. It provide some meaning to the bruno. Few tags are:
1. meta: Store metadata about your request
meta {
  name: Get users,
  type: http
  seq: 1
}
type: can be either http or graphql.
seq: is used to store the sequence number.
This decides the sort position of your request in the UI.
[which request should run first.]
2. get: Make a GET http call
get {
  url: https://api.github.com/users/usebruno
}
3. post: Make a POST http call
post {
  url: https://api.github.com/users/usebruno
}
4. put: Make a PUT http call
put {
  url: https://api.github.com/users/usebruno
}
5. delete: Make a DELETE http call
delete {
  url: https://api.github.com/users/usebruno
}
For more information: Bru Tag Reference
For syntax highlighting support for bru language. Syntax Highlighting Support.
Please read about Secrets Management, Scripting and Testingtoo
In scripting and testing you can use javascript. Bru contains inbuilt libraries and if you need other external javascript libraries you can install that too. Example is given in the docs:
Inbuilt Libraries
Below are the list of inbuilt libraries that you can import in your scripts.
- ajv — Ajv JSON schema validator
- axios — Promise based HTTP client for the browser and node.js
- node-fetch — A light-weight module that brings Fetch API to Node.js.
- atob — Turn base64-encoded ascii data back to binary.
- btoa — Turn binary data to base64-encoded ascii.
- chai — BDD/TDD assertion library for node.js and the browser.
- lodash — A modern JavaScript utility library delivering modularity, performance & extras.
- moment — Parse, validate, manipulate, and display dates and times in JavaScript.
- uuid — For the creation of RFC4122 UUIDs
- nanoid — A tiny, secure, URL-friendly, unique string ID generator for JavaScript.
- crypto-js — JavaScript library of crypto standards.
Example:
const { nanoid } = require("nanoid");
req.setHeader("transaction-id", nanoid());
External Libraries
For external library install the library using npm then include in script or test.
Example: npm i @faker-js/faker
const { faker } = require('@faker-js/faker');
const randomName = faker.name.fullName();
const randomEmail = faker.internet.email();
req.setBody({
  name: randomName,
  email: randomEmail
});
You are allowed to use top level await of javascript in script or test.
I highly recommend reading about JavaScript API Reference and Response Query. Bruno uses chai for testing.
Some of the benefits of testing:
- Increased efficiency: The tests can be run repeatedly, reducing the time and effort required for manual testing.
- Increased coverage: Automated tests can cover a larger range of scenarios and edge cases compared to manual testing.
- Continuous integration/continuous delivery (CI/CD): Automated API tests can be integrated into a CI/CD pipeline, ensuring that API changes are thoroughly tested before deployment.
- Easier maintenance: Automated tests can be easily updated as the API evolves, reducing the maintenance burden compared to manual tests.
- Easier regression testing: Automated tests can be easily repeated after changes are made to the API, reducing the time required for regression testing.
Example:
test("should be able to login", function() {
  const data = res.getBody();
  expect(res.getStatus()).to.equal(200);
});

test("should receive the token", function() {
  const data = res.getBody();
  expect(data.token).to.be.a('string');
});
They have included lots of example and their docs is pretty small. You can read whole docs in like 15 to 20 min. Just read the whole docs thoroughly.
Practical Started:
Enough of theory, let the play begin 😁.
To get started with bruno you need to have node js installed in your machine. I use volta for node JS version management. You are free to use as you like.
After installing nodeJS. Install the bruno:
npm install -g @usebruno/cli
Go to the project which has the REST API implemented.
Here I am going to use json-server for REST API.
Create a project:
- Create Folder: mkdir api_test
- Go to Folder: cd api_test
- Initialize project: npm init -y
Add bruno.json so that bruno know the folder api_test is a collection.
Note: Here api_test is both project as well as collection for bruno.
- Create bruno.json file: touch bruno.json
- Add the following content in bruno.json
{
  "version": "1",
  "name": "example rest api test",
  "type": "collection"
}
For faster REST API development I am going to use json-server.
- Install json-server: npm install -g json-server
- Create an employeeDB.json file and add following content: touch employeeDB.json
{
  "employees": [
    {
      "id": 1,
      "name": "Ram",
      "salary": "10000"
    },
    {
      "id": 2,
      "name": "Bob",
      "salary": "8000"
    }
  ]
}
- Create a routes.json and add the following content: touch routes.json
{
  "/employees/list": "/employees",
  "/employees/get/:id": "/employees/:id",
  "/employees/create": "/employees",
  "/employees/update/:id": "/employees/:id",
  "/employees/delete/:id": "/employees/:id"
}
The above routes.json file is aliasing the default route to the custom route. Aliasing the route is violating the standard of REST architecture endpoint naming convention but helping us to learn.
- Run the json-server: json-server —port 8000 —routes routes.json —watch employeeDB.json
- On navigating to the url: http://localhost:8000/employees/list
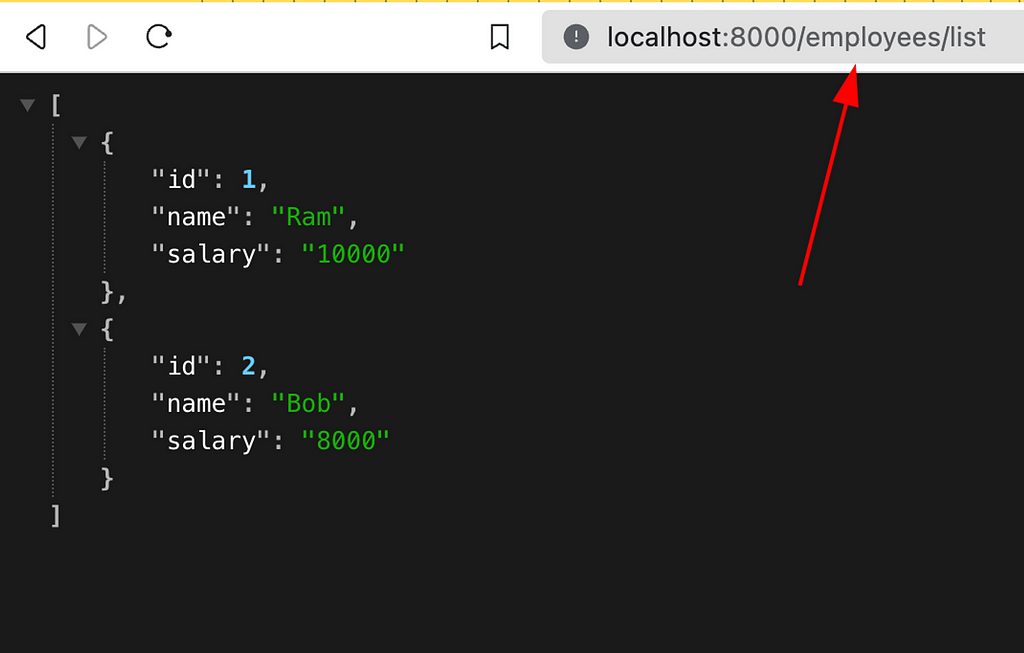
navigating to /employees/list
Lets test it using the bruno
- Create employee_bruno folder : mkdir employee_bruno
- Add the following content in list_employee.bru to get the list of employees and test if the status is 200 and result has of length 2. touch employee_bruno/list_employee.bru
- Then run the bru: bru run employee_bruno
meta {
  name: List Employee
  type: http
  seq: 1
}
get {
  url: http://localhost:8000/employees/list
}
headers {
  content-type: application/json
}
script:pre-request {
  console.log("Before the api hit!!!");
  console.log("We can get the token or anything which require for the api");
}
script:post-response {
  console.log(res.getBody())
  console.log("After the api hit!!!");
  console.log("We can set the token or anything which require for the api");
}
tests {
  test("should have response status 200", function() {
      expect(res.getStatus()).to.equal(200);
  });
  test("should have employees length 2", function() {
      const data = res.getBody();
      expect(data.length).to.equal(2);
  });
}
- Add the following content in get_employee.bru to get the employee from id and test if the status is 200. touch employee_bruno/get_employee.bru
meta {
  name: Get Employee
  type: http
  seq: 2
}
get {
  url: http://localhost:8000/employees/get/1
}
script:post-response {
  console.log(res.getBody())
}
tests {
  test("should have response status 200", function() {
      expect(res.getStatus()).to.equal(200);
  });
}
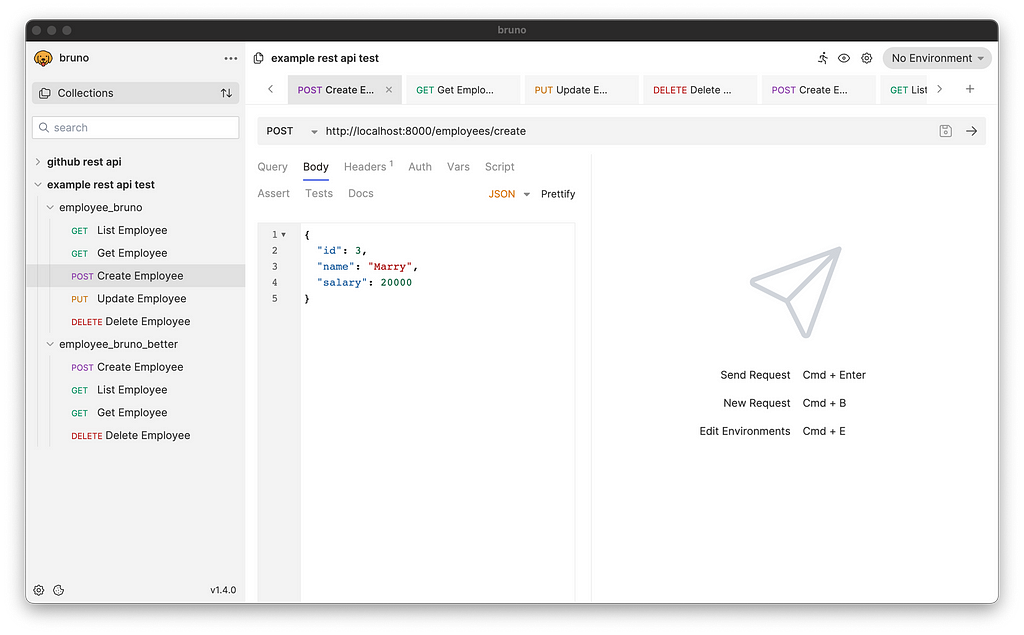
- Add the following content in create_employee.bru to create the employee and test if the status is 201 and created employee has id 3. touch employee_bruno/create_employee.bru
meta {
  name: Create Employee
  type: http
  seq: 3
}
post {
  url: http://localhost:8000/employees/create
}
headers {
  content-type: application/json
}
body {
  {
    "id": 3,
    "name": "Marry",
    "salary": 20000
  }
}
script:post-response {
  console.log(res.getBody())
}
tests {
  test("should have response status 201", function() {
      expect(res.getStatus()).to.equal(201);
  });
  test("should have employee id 3", function() {
      const data = res.getBody();
      expect(data.id).to.equal(3);
  });
}
- Add the following content in update_employee.bru to update the employee and test if the status is 200 and employee name is Max. touch employee_bruno/update_employee.bru
meta {
  name: Update Employee
  type: http
  seq: 4
}
put {
  url: http://localhost:8000/employees/update/3
}
headers {
  content-type: application/json
}
body {
  {
    "id": 3,
    "name": "Max",
    "salary": 20000
  }
}
script:post-response {
  console.log(res.getBody())
}
tests {
  test("should have response status 200", function() {
      expect(res.getStatus()).to.equal(200);
  });
  test("should have employee name Max", function() {
      const data = res.getBody();
      expect(data.name).to.equal("Max");
  });
}
- Add the following content in delete_employee.bru to delete the employee by ID and test if status is 200. touch employee_bruno/delete_employee.bru
meta {
  name: Delete Employee
  type: http
  seq: 5
}
delete {
  url: http://localhost:8000/employees/delete/1
}
script:post-response {
  console.log("DELETED!!!");
}
tests {
  test("should have response status 200", function() {
      expect(res.getStatus()).to.equal(200);
  });
}
Above test is nice but I want something like
- create the 1st employee then
- check if the list has 3 employee and
- finally deleted the created employee dynamically.
I don’t want to add the hard coded value which I have been doing above. Also domain name is hard coded it can be added in variable.
Lets dig in:
- Create a new directory employee_bruno_better: mkdir employee_bruno_better
- Create an environments directory: mkdir environments
- Create an Employee.bru file inside the folder then add the following: touch environments/Employee.bru
vars {
  baseUrl: http://localhost:8000
}
- Since we are first creating the employee so adding seq: 1. Also to get the value of baseUrl while running the bru we pass the—env:
bru run employee_bruno_better —env Employee
Add the following in create_employee.bru inside employee_bruno_better
meta {
  name: Create Employee
  type: http
  seq: 1
}
post {
  url: {{baseUrl}}/employees/create
}
headers {
  content-type: application/json
}
body {
  {
    "id": 3,
    "name": "Marry",
    "salary": 20000
  }
}
script:post-response {
  bru.setVar("id", res.getBody().id);
  bru.setVar("createdEmployee", res.getBody());
}
tests {
  test("should have response status 201", function() {
      expect(res.getStatus()).to.equal(201);
  });
  test("should have employee id 3", function() {
      const data = res.getBody();
      expect(data.id).to.equal(3);
  });
}
- The above is simple lets use the external library faker and use it to fill the name field:
- Install the faker library: npm i @faker-js/faker
meta {
  name: Create Employee
  type: http
  seq: 1
}
post {
  url: {{baseUrl}}/employees/create
}
headers {
  content-type: application/json
}
script:pre-request {
  const { faker } = require('@faker-js/faker');
  const randomName = faker.name.fullName();
  req.setBody({
    "id": 3,
    "name": randomName,
    "salary": 20000
  })
}
script:post-response {
  bru.setVar("id", res.getBody().id);
  bru.setVar("createdEmployee", res.getBody());
}
tests {
  test("should have response status 201", function() {
      expect(res.getStatus()).to.equal(201);
  });
  test("should have employee id 3", function() {
      const data = res.getBody();
      expect(data.id).to.equal(3);
  });
}
- Similarly to get the employee with the id 3 we can add the following in get_employee.bru: Note: id has been set by the above bru file.
meta {
  name: Get Employee
  type: http
  seq: 3
}
get {
  url: {{baseUrl}}/employees/get/{{id}}
}
script:pre-request {
  const e = bru.getVar("createdEmployee");
  console.log(typeof(e), e)
}
script:post-response {
  console.log("RES::", res.getBody())
}
tests {
  test("should have response status 200", function() {
      expect(res.getStatus()).to.equal(200);
  });
}
Now push the file in the repo. You can use the environment variable of OS or .env file for the variable as well. Please read the docs about DotEnv File and Secret Variables. so that you don’t push the credentials in the git repo. For complete example please refer to the github repo.
You can even open the collection using bruno GUI application ie. the folder which have the bruno.json file. You can download the bruno GUI application from here.
Bruno GUI Application
This is just the tip of the ice-berg you can do many things using bruno. I hope you like this blog.
Thank you Anoop M D and maintainers for developing bruno. 🫡
Follow me in medium and clap if you like it. I will be sharing these interesting stuffs.
Thank you 🙏

Bruno | A better API client for developers was originally published in wesionaryTEAM on Medium, where people are continuing the conversation by highlighting and responding to this story.