The use of a single logical software application or service to serve multiple customers.
Have you deployed your app on Vercel or Netlify? If so, you’ve probably noticed that it automatically generates a subdomain for your app. Not only that, but they also allow you to add a custom domain and provide HTTPS support. Amazing, right?

single tenant vs multi tenant architecture diagram
So, what exactly is multi-tenant architecture?
In simple terms, it’s a way to manage multiple customers (tenants) on the same infrastructure. A single application or service is shared among all tenants, who are uniquely identified to ensure seamless service.
Think of it like a house where multiple tenants live. The house represents the software application, and each tenant has their own space, sharing the same foundation. Similarly, multiple clients can use the same software without interfering with one another.
The key to multi-tenant architecture is the ability to uniquely identify and manage each tenant effectively. That’s the core concept.
There are different ways to implement multi-tenant software:
- No Custom Domain: All tenants share the same domain.
- Custom Domain: Each tenant can use their own unique domain.
In a No Custom Domain approach, clients are isolated using a unique tenant ID. Clients create an account and use the software, but the domain remains that of the software provider. Its easier to implement but the harder one is to provide custom domain.
Before the implementation of custom domain multi tenant software. Lets take a look at Medium Request Headers.
Medium is also a multi tenant software which allow Custom Domain. Lets check the request response of https://articles.wesionary.team/.
:authority: articles.wesionary.team
:method: POST
:path: /_/graphql
:scheme: https
accept: */*
accept-encoding: gzip, deflate, br, zstd
accept-language: en-US,en;q=0.9,ja;q=0.8
apollographql-client-name: lite
apollographql-client-version: main-20241122-011124-9eb6e2f514
cache-control: no-cache
content-length: 21346
content-type: application/json
cookie: ...
graphql-operation: CollectionViewerEdge
medium-frontend-app: lite/main-20241122-011124-9eb6e2f514
medium-frontend-path: /
medium-frontend-route: collection-homepage
origin: https://articles.wesionary.team
pragma: no-cache
priority: u=1, i
referer: https://articles.wesionary.team/
sec-ch-ua: "Google Chrome";v="131", "Chromium";v="131", "Not_A Brand";v="24"
sec-ch-ua-mobile: ?0
sec-ch-ua-platform: "macOS"
sec-fetch-dest: empty
sec-fetch-mode: cors
sec-fetch-site: same-origin
user-agent: Mozilla/5.0 (Macintosh; Intel Mac OS X 10_15_7) AppleWebKit/537.36 (KHTML, like Gecko) Chrome/131.0.0.0 Safari/537.36
Please take a look at header origin. You can also check request header of other website it will always contain origin header.
Medium also send other headers too like.
medium-frontend-path: /
medium-frontend-route: collection-homepage
It might be for their use case but in order to implement simple we don’t need to send other headers. We just need to consider the origin header.
Architecture:

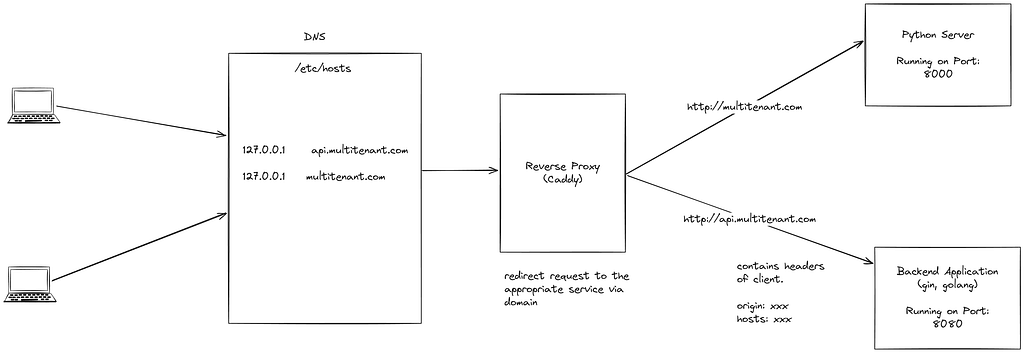
architecture of multi-tenant implementation
In this multitenant architecture, we will simulate DNS to handle two domains:
- api.multitenant.com
- multitenant.com
Since these domains are not owned by us, we will use the /etc/hosts file to simulate DNS resolution. Update the /etc/hosts file with the following entries:
127.0.0.1 api.multitenant.com
127.0.0.1 multitenant.com
With this configuration, when you ping api.multitenant.com or multitenant.com, their IP address will resolve to 127.0.0.1 (localhost).
From the architecture diagram:
- HTML content is served by a Python service (or any other service of your choice) running on port 8000.
- The backend service is running on port 8080. [Read the implementation below]
When a request is made to http://multitenant.com, it should be forwarded to the service running on port 8000. Similarly, when a request is made to http://api.multitenant.com, it should be forwarded to the backend service running on port 8080.
To achieve this behavior, we use a reverse proxy. In this setup, we are using Caddy as the reverse proxy. Below is the Caddy configuration to route traffic correctly:
http://api.multitenant.com {
    reverse_proxy localhost:8080
}

http://multitenant.com {
    reverse_proxy localhost:8000
}
With this configuration:
- Requests to http://multitenant.com will be routed to the HTML-serving service on port 8000.
- Requests to http://api.multitenant.com will be routed to the backend service on port 8080.
This setup ensures proper routing for our multitenant architecture and facilitates the separation of frontend and backend services.

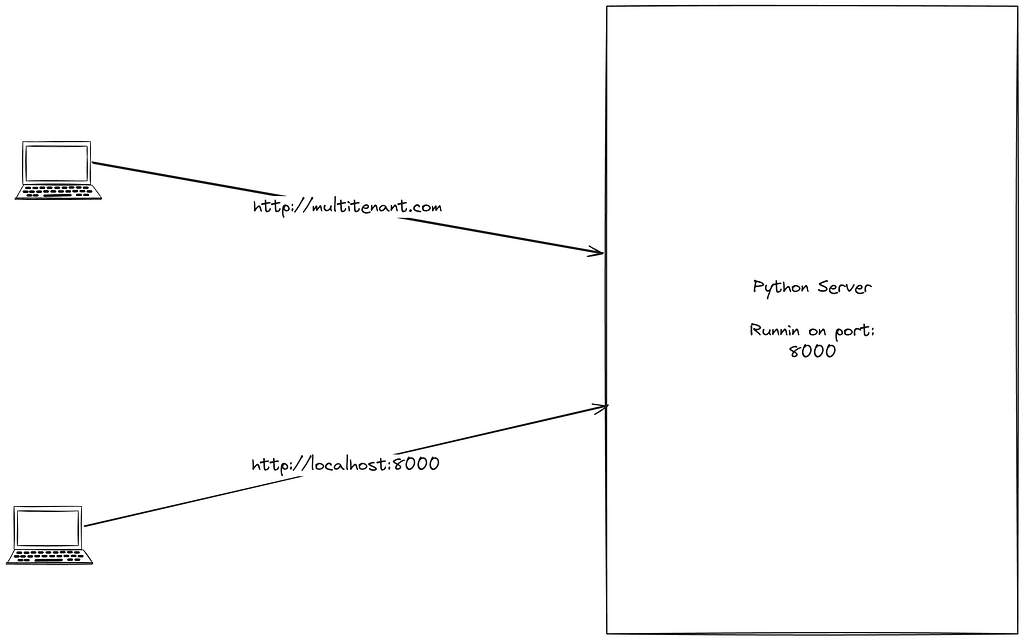
two domain pointing to same service
Now, let’s explore the main implementation of our multitenant architecture in Golang.
Implementation of Multi tenant architecture using golang
We will implement a multi-tenant architecture using a shared database and tables. Each tenant’s data will be partitioned using a unique tenant_id.
MultitenantDomain
|         domain        | tenant_id |
|-----------------------|-----------|
|localhost:8000         | 12345     |
|multitenant.com        | 11223     |

...
TenantInformation
| tenant_id |      detail.          |
|-----------|-----------------------|
| 12345     | I am localhost        |
| 11223     | I am multitenant.     |
...
Steps for Multi-Tenant Implementation
Extract the Origin Header
- We could use the Host header in the backend if the frontend and backend share the same domain.
- However, with modern Single Page Applications (SPA) like Vue, React, or Svelte, which are often deployed to different domains, APIs communicate with the backend using the Origin header to identify the actual client’s domain.
Fetch the Tenant ID from the Origin Using Persistent Storage
- Middleware will fetch the tenant_id based on the domain (extracted from the Origin header) stored in a persistent database.
Use the Tenant ID to Isolate Data
- All operations will use the tenant_id to ensure data isolation for each tenant.
Code Implementation
Middleware to Extract Tenant ID
func (t *TenantMiddleware) ExtractTenantIDFromDomain() gin.HandlerFunc {
 return func(c *gin.Context) {
  // Extract the header origin
  origin := c.Request.Header.Get("Origin")
  host := c.Request.Host
  domain := origin
  if domain == "" {
   domain = host
  } else if strings.Contains(domain, constants.HTTP) {
   domain = strings.Replace(domain, constants.HTTP, "", -1)
  } else if strings.Contains(domain, constants.HTTPS) {
   domain = strings.Replace(domain, constants.HTTPS, "", -1)
  }

  // Fetch the tenant id from the origin using persistent storage
  tenantID := t.db.FindTenantIDByDomain(domain)
  c.Set(constants.TenantID, tenantID)
  c.Next()
 }
}
Handler to Get Tenant Details
func (h *Handler) GetDetail(c *gin.Context) {
 tenantID, exists := c.Get(constants.TenantID)
 if !exists {
  c.AbortWithStatusJSON(http.StatusBadRequest, &Error{
   Message: "tenant not found",
  })
 }
 // Use the tenant id in order to isolate the data from other tenant
 detail := h.db.FindDetailByTenantID(tenantID.(string))

 c.JSON(http.StatusOK, &Response{
  Data: detail,
 })
}
For complete code checkout the following repository.
GitHub - mukezhz/simple-multitenant
Steps to run the application:
Add the following domain in your /etc/hosts
Update /etc/hosts with the following entries:
Update the /etc/hosts file to map custom domains to 127.0.0.1. This allows the application to simulate DNS behavior for a multitenant environment locally. Add these lines to the /etc/hosts file:
...
127.0.0.1 api.multitenant.com
127.0.0.1 multitenant.com
This ensures the custom domains resolve correctly on your local machine.
Run the Gin application:
Execute the backend service written in Golang:
go run cmd/main.go
This starts the server that handles API requests for the application.
Run the Caddy server:
Launch the Caddy server to manage reverse proxying for the application:
caddy run --config Caddyfile
Caddy serves as the web server and handles routing for the custom domains.
Serve the frontend:
Start a lightweight HTTP server to serve the frontend files locally:
python -m http.server 8000
This enables access to the frontend application via a web browser.
Test the Application:
- Navigate to http://localhost:8000 or http://multitenant.com.
- Check the network tab to see the request headers.
Example Outputs
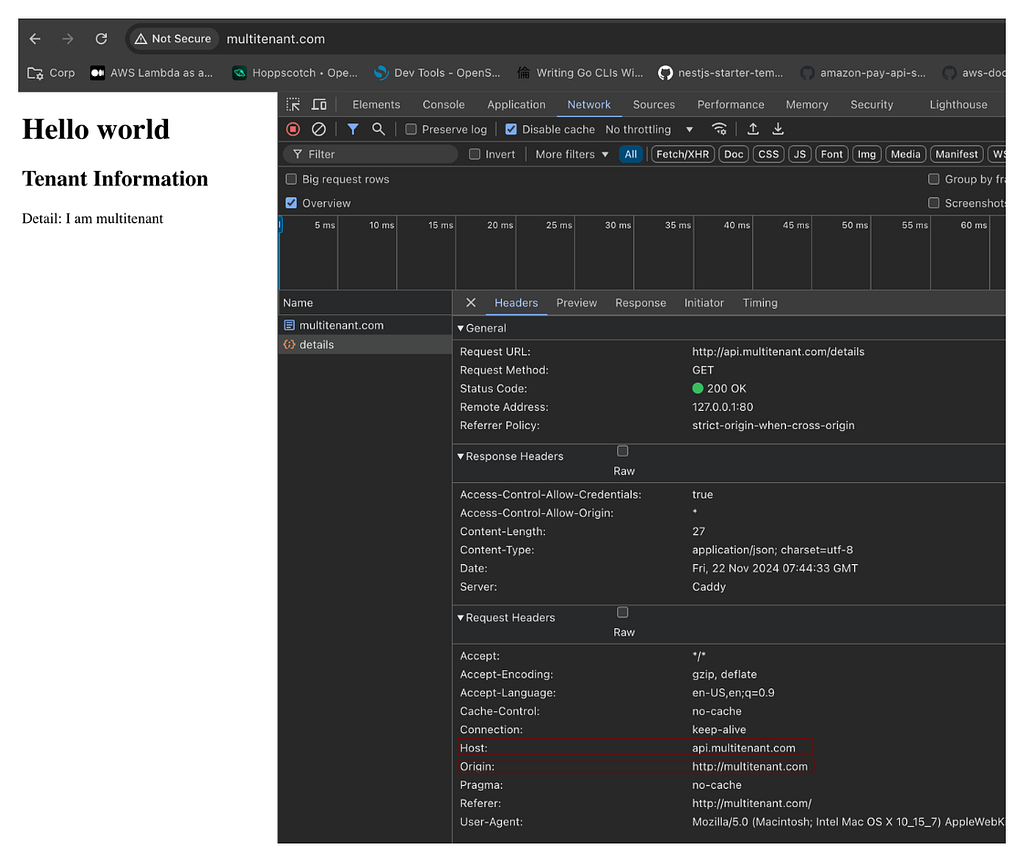
Navigating to http://multitenant.com:
{"data":"I am multitenant"}

network tab of multitenant.com
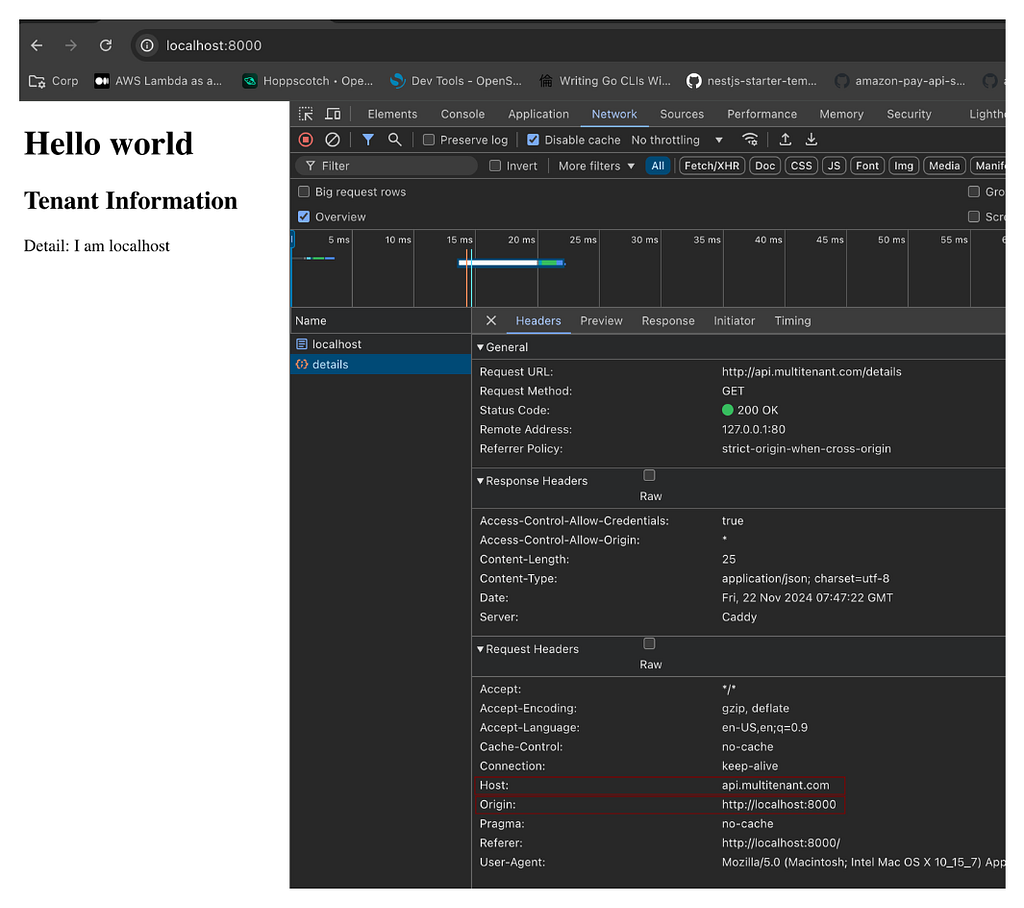
Navigating to http://localhost:8000:
{"data":"I am localhost"}

network tab of localhost:8000
Key Takeaways
We have implemented a basic multi-tenant application where tenants are identified using their domain. The backend uses a shared infrastructure (same database) for all tenants but isolates data using a tenant_id.
If a tenant has higher requirements (e.g., large data or traffic), you may need to use separate infrastructure, such as a dedicated database for that tenant.
In the next article, I will explain how to automatically generate HTTPS certificates for custom domains added by tenants. Stay tuned!
I hope you enjoyed this article! If you’d like to connect with me, feel free to reach out on LinkedIn: Linkedin
References:
- Multi-Tenant Architecture: How It Works, Pros, and Cons | Frontegg
- Exploring Multi-Tenant Architecture: A Comprehensive Guide
- Multi-Tenant Application
- Complete Guide to Multi-Tenant Architecture
Thank you!!!
धन्यवाद 🇳🇵

Building a Multi-Tenant Architecture in Golang: A Practical Guide was originally published in wesionaryTEAM on Medium, where people are continuing the conversation by highlighting and responding to this story.