The most underrated git command
TL;DR:
On using git worktree you don’t need to use git stash if you want to test or fix the bug. 🐛
GIT:
As we all know git helps us to keep track of changes made to files in a project over time. Most of the case we use the following basic commands.

Basic Commands:
- git init: Initialize a new Git repository.
- git clone: Copy a remote repository onto your local machine.
- git add: Stage changes for commit.
- git commit: Save the staged changes along with a descriptive message.
- git push: Send local commits to a remote repository.
- git pull: Update your local repository with changes from a remote repository.
- git merge: Join two or more development histories together.
- git commit: Record changes to the repository
- git worktree: Manage multiple working trees
- for more info: man git
git worktree: The most underrated git command
Git worktree is a feature in Git that allows you to have multiple working copies of your repository in different directories on your filesystem.
This is really handy because it lets you work on different branches or different versions of your code simultaneously without needing to switch branch back and forth within a single working directory.
Keep reading you will know what I am trying to say. 😋
To get more information about the worktree you can use the following command.
man git-worktree
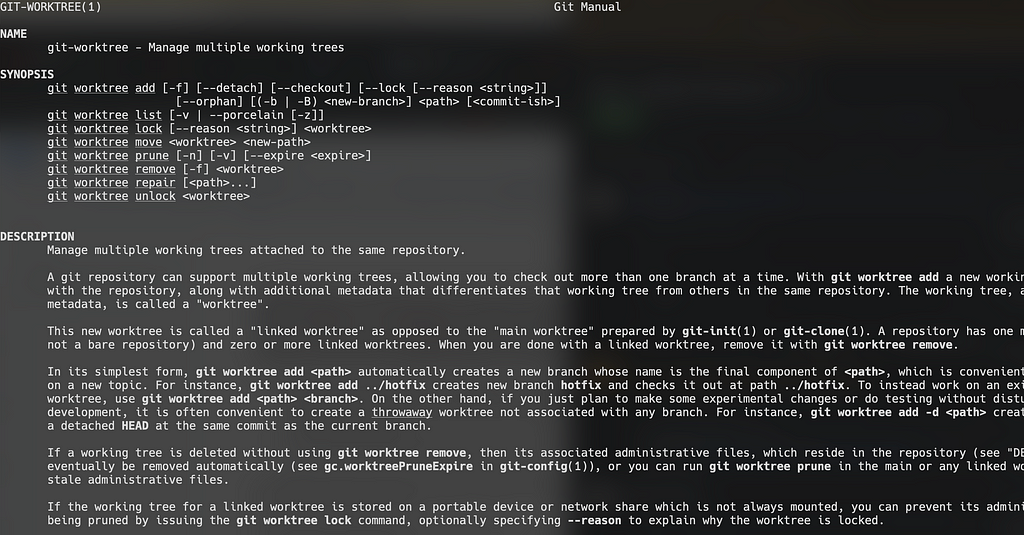
man git-worktree
Consider the following scenario:
CASE I:
Let’s imagine you are working in a feature A branch and you have changes many files while working in that feature. Now your collaborator or colleague send you a Pull Request or Merge Request of feature Bbranch or you just wanted to test feature Bbranch .
or
CASE II:
Let’s imagine you are working in a feature A and you have changes many files while working in that feature. Now your stack holder encounter a critical bug in the production branch (generally main branch).
What will you do in the above cases?
Solution 1:
- you add the changes to the staging area
- you stash the changes (by adding proper message)
- you switch the feature B branch or production branch.
- you review the code or fix the bug of branch
- you push the branch [feature B or production branch]
- finally you switch back to the feature A branch and apply the stash or pop the stash
Solution 2:
- Yes you are correct 🎉, use git worktree
Let’s Start:
I am considering the case II you will know what to do in case I.
Suppose you have:
- main branch where your project is working in production with v1.0.1
// main branch code

// main.go file code
package main

import "fmt"

func main() {
  Feature()
  fmt.Println("Production v1.0.0")
}


// feature.go file code
package main

import "fmt"

func Feature() {
 fmt.Println("feature")
}
- you created a branch from main and working in feature A branch.
// feature A branch code
package main

import "fmt"

func main() {
  fmt.Println("Production v1.0.0")
}

func featureA() {
  fmt.Println("feature A")
}
In main branch. The version should be v1.0.1 but it’s critical bug it’s v1.0.0 .
In above example we have just changed single file but in real project we will be changing lots of file. So instead of stashing the changed file. It’s better to just do the following;
Syntax: git worktree add
Command: git worktree add .worktrees/main main
This will create a .worktrees/main directory in your current folder.
You can verify by listing the your current project directory:
Command: ls -al
Now just navigate to the .worktrees/main directory.
cd .worktrees/main
On navigating to the directory you has already entered to main branch
And inside that branch you will get the main branch code.
Now change the code:
// main branch code
package main

import "fmt"

func main() {
  fmt.Println("Production v1.0.1")
}
Then add, commit and push the code to your main branch after hotfix.
Now navigate back to your working directory:
cd ../..
Remove the work tree:
git worktree remove .worktrees/main
Not commit your code of feature A branch and pull the main branch and merge in feature A branch.
Final code:
// final code of feature A branch
package main

import "fmt"

func main() {
  fmt.Println("Production v1.0.1")
}

func featureA() {
  fmt.Println("feature A")
}
For demo you can watch: https://youtu.be/fMdiAWgkfDA
Note: .worktrees file will remain so you need to add that folder in .gitignore
Note: git ignored file won’t be available on your worktree directory you need to manually copy those files for example: .env files
Similarly if you wanted to check the feature B branch just add a worktree and navigate to that directory test the code and remove the work tree.
Working of git worktree:
When you enter the command: git worktree add
- It creates a new directory at the specified
. - It initializes this directory as a worktree linked to the main git repository.
- It checks out the specified
in this new worktree.
main git repository → your project root git repository
Git maintains a record in the .git/worktrees directory within the main git repository. This directory contains subdirectories for each additional worktree, each holding:
- HEAD pointing to the current commit of the worktree.
- index for staging changes.
- logs for operation logs specific to the worktree.
- config file for worktree-specific configurations.
You can make commits, switch branches, or perform any other Git operations within any worktree without affecting others
Best Practices:
- Do Not Checkout the Same Branch
- Prune Stale Worktrees: git worktree remove
Thank you!!!
धन्यवाद 🇳🇵🙏

git worktree | Enhance your development with git was originally published in wesionaryTEAM on Medium, where people are continuing the conversation by highlighting and responding to this story.